
Are you unsure how to tell if a roofing company actually knows how to install a metal roof correctly, or if they’re just winging it? Wondering if it’s really worth paying more for advanced metal roofing techniques (or if that’s just upselling)?
You’re right to be cautious. Unlike with asphalt shingles, you can’t just follow a generic install guide and expect great results on a metal roof. One small mistake in the valley, ridge, or fasteners can lead to expensive leaks, rust, or warped panels that ruin your roof’s longevity.
At RoofSmart, we’ve installed thousands of roofs across the Greater Seattle area, and about 100 of those each year are metal. In this article, we’ll walk you through:
- How we set ourselves apart with advanced techniques and attention to detail
- Why experience, equipment, and craftsmanship matter more with metal roofing
- What to look for when choosing a contractor for your metal roof (and what to avoid)
By the end, you’ll know exactly why RoofSmart takes extra steps that most other companies skip and why that matters for your roof’s long-term durability and performance.

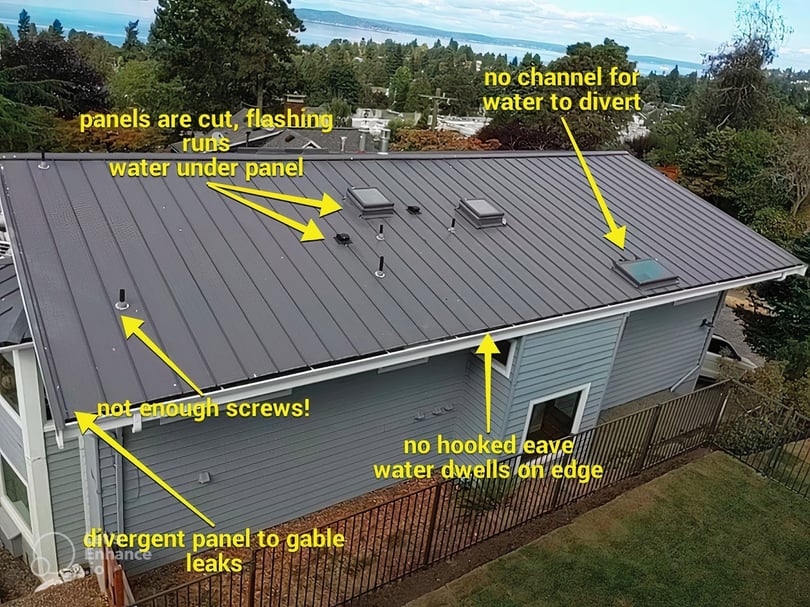
What makes a roofing company qualified to work on metal roofs?
At RoofSmart, I hold my crews to the highest standards. It’s important to me that your hard-earned money goes towards a roof that is built well, looks great, and lasts for a long time.
Any roofing company can make that promise, so this article is dedicated to showing you the ways we distinguish ourselves from our competition. Here’s what makes my team highly experienced and motivated to deliver you the best metal roof possible:
- Years of experience installing metal roofs: At RoofSmart, we install around 100 metal roofs every year. After more than 15 years in the roofing industry, we’ve dedicated a lot of time to making sure we get every detail of your metal roof right.
- We can install any kind of metal roof: My team installs all kinds of different metal roofs, so you aren’t limited to just one option with us. We’ve done classic standing seam roofs, stamped metal roofs, and have even worked with copper. We operate as a guide, so we don't just push a metal option that just has a pretty brochure. We believe it’s important that you have plenty of options so that you can choose a metal roof that works for your aesthetic and budget. There are small differences between all of the products, including the colors, the finishes, the final look, and the panel thickness. Each one makes a difference in the appearance and cost of the roof.
- We also make custom parts (like a metal chimney cap). We can customize things to meet your roof’s needs.
- We are experienced in mechanically seamed roofs. In fact, we do so many metal roofs per year that we have our own in-house hydraulic seamer for mechanically seamed metal roofing (as opposed to renting one).
- Our crews are motivated to install your roof correctly: We pay our guys probably 20% more than the average. Why does that matter to you? Well, it gets you a better quality craftsman who is motivated to stick around, continue gaining experience, and do a great job on every roof. They get paid to do the job to a very high standard.


What extra steps does RoofSmart take on metal roofs to protect from Seattle's rain?
Unlike with asphalt shingles, where any guy off the street corner at Home Depot can give it a go, metal roof installation requires training and practice to get it right. In a rainy, damp area like Seattle, it’s especially important that your roof is installed properly.
Here’s a sampling of some extra measures we take to protect your roof from leaks:
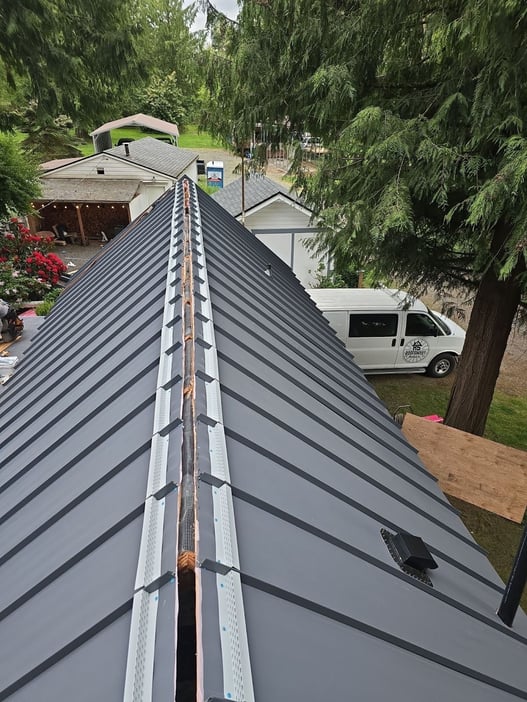
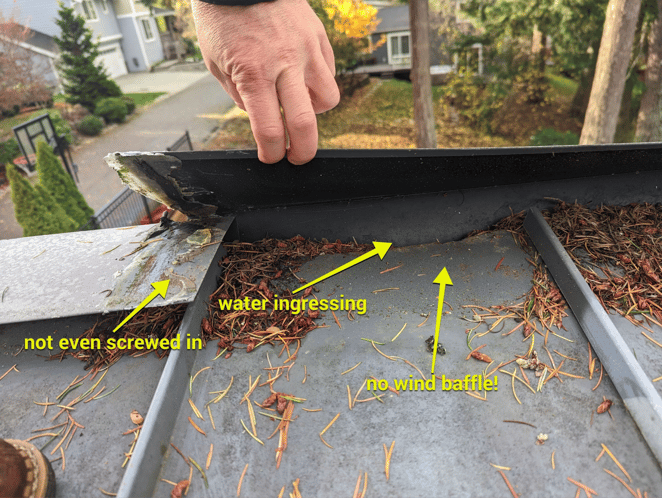
Cleated Valleys
A cleat is an additional strip of metal added to a valley. To make your valley more secure and waterproof, the edges of the panels are wrapped under the cleat.
This creates hemmed edges in the valley, which are fully protected by their paint and other coatings. Hemmed edges prevent early failure, improve aesthetics, and block debris/bugs. Here’s what it looks like:
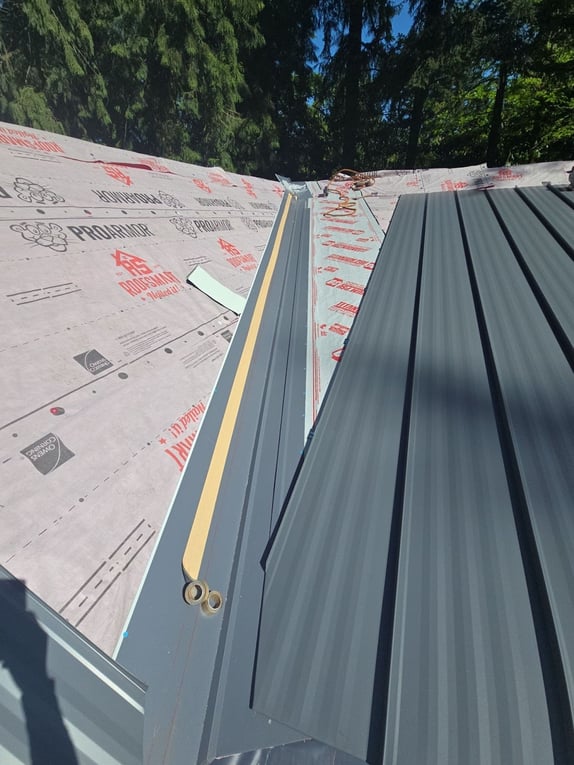
In this image, the cleat has been installed on the right side of the valley. You can see that the bottom left corner of the panel has been wrapped around the cleat.
Sawing off the edge of the panel and leaving it as is in the valley will burr the edge, rupture the zinc coating of the panel, and cause the paint to peel. Even if a good saw is used, you never want the raw edge of the panel in a valley where all the water is. It will definitely cause the panel to rust, and could even cause a leak.
Another risk of not using cleats is that the panels might shift or flop around, leaving gaps for water or pests to get into the roof. You can glue it down, but this is not very secure.
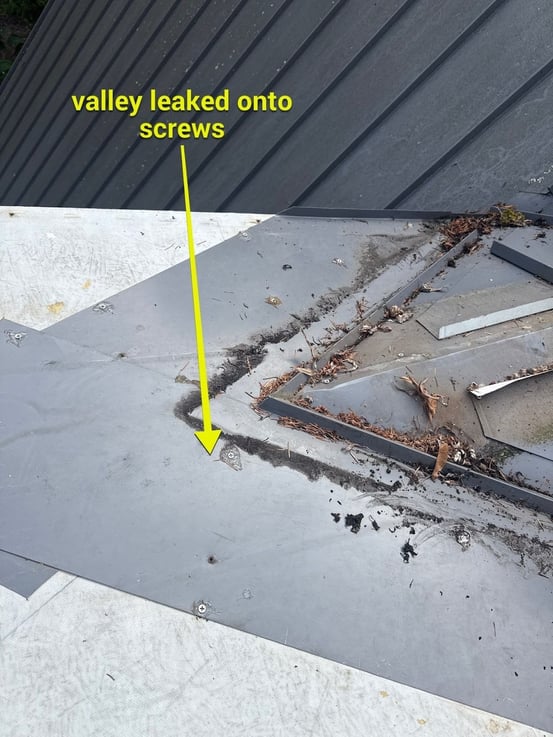
Another issue that’s avoided with cleated valleys is using screws too far into the valley that end up leaking. I know that this sounds like a no-brainer, but you’d be surprised how often we see it happen.
Here’s an example:
Custom Ridge Vent Assembly
Here’s what our ridges look like during installation:
Vs
We know water doesn’t always go downhill. Sometimes there’s wind, or wicking, or ice dams. Our assembly takes this into account. It is better at keeping wind-driven rain out of the ridge than other methods, like putting a foam insert in the ridge that can soak up water and even get picked apart by birds.
Many companies use the foam, but we don’t think it’s very effective. Some, like the one pictured, use nothing at all!
And then we have a custom 18-gauge metal screen that goes up underneath as the bug screen.
We can also do a concealed fastener hip and ridge, where it's done with rivets. The standard way is to just screw right through it.
We do offer both because it's twice the labor to do a concealed. But sometimes it is the only way to do it. Also, the concealed fastener method has a much lower profile. It sits lower, much tighter, and it's not as bulky.
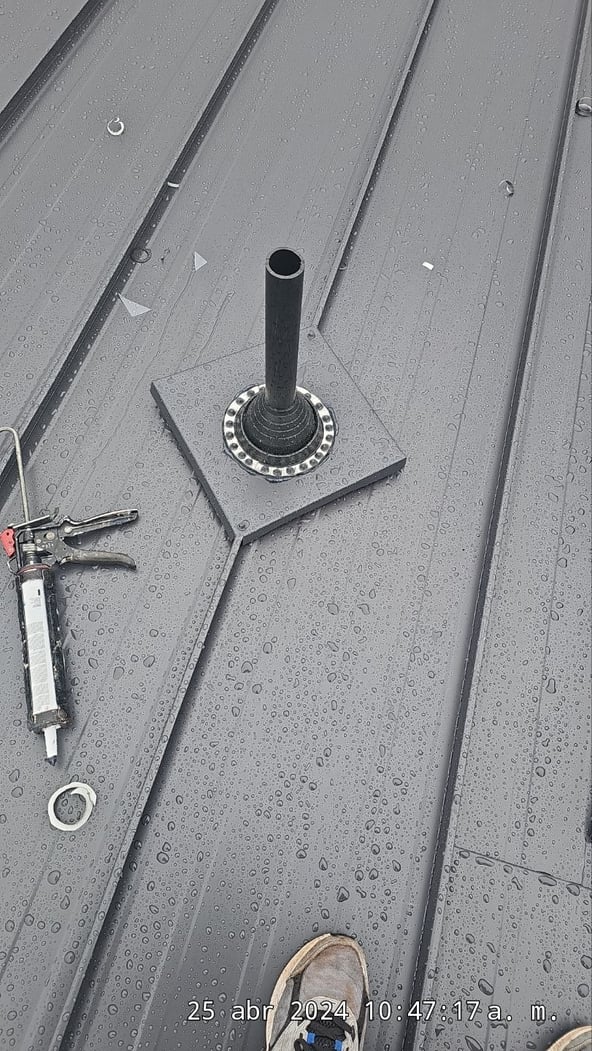
Home Plate Flashing (around objects sticking out of the roof)
Vs
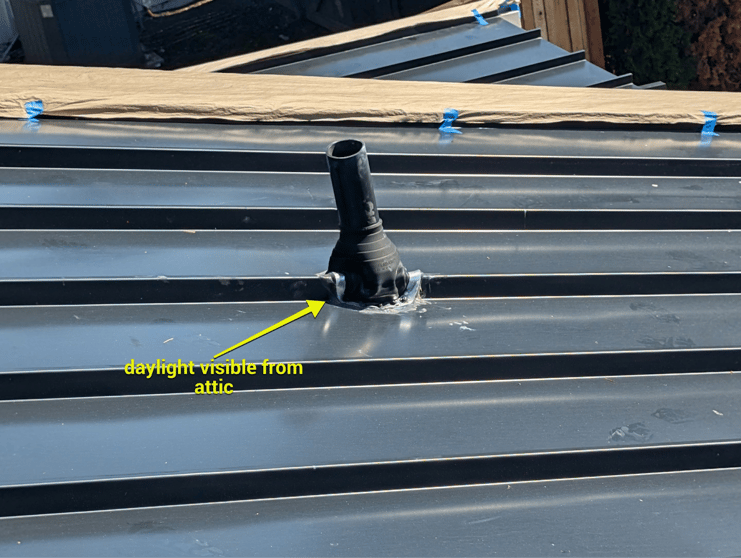
We create a custom-fabricated flashing to put around pipes or other smaller objects that come through the roof. For example, if there’s a pipe sticking out of the roof, a lot of roofers rely on an EPDM boot. This is standard.
We don’t like those because they are cheap and will break down after a handful of years. That’s the last thing you want on a roof that you’re spending so much money on and expecting to last 50+ years.
We create an elevated platform that seals in the pipe and blocks water from entering on all sides. It’s much more durable and longer-lasting than an EPDM boot.
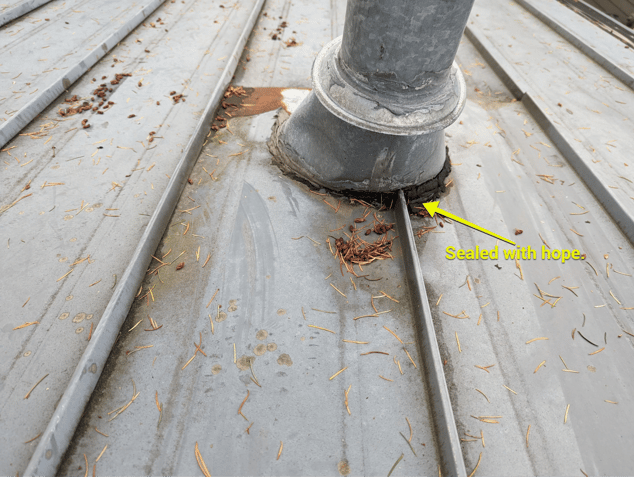
Elevated Curbs for Sun Tunnels
vs.
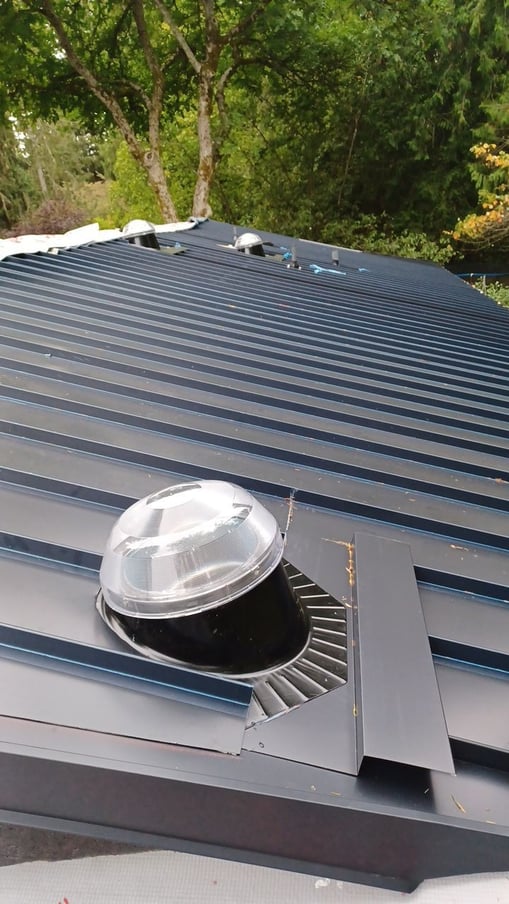
At RoofSmart, we build overlapping layers of metal for sun tunnels and other penetrations. This helps to redirect water around it and prevent leaks.
That way, there are no weak points that rely on caulking, and water isn't just running onto it (like the b-vent furnace pipe with terrible caulking pictured above).
Other contractors might use caulking to seal around it. Not everyone does, but we’ve inspected and repaired a lot of metal roofs with leaks around skylights (or other objects coming through the roof) due to caulking that wears away after several years.
Hooked Eaves
This is another hemmed edge. So, instead of just having the panel stop and then leaving a gap at the gutter edge, we wrap it around and fold it.
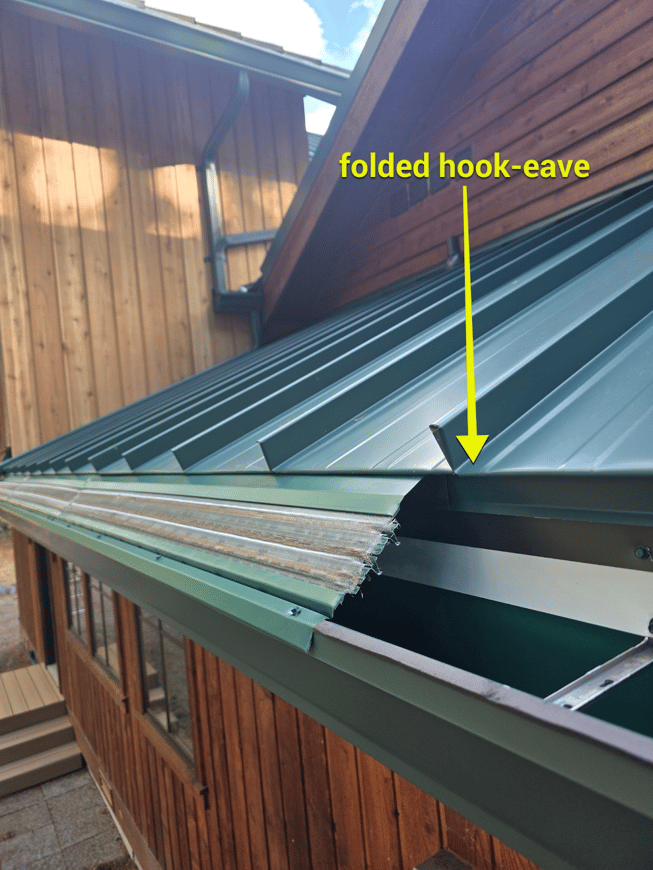
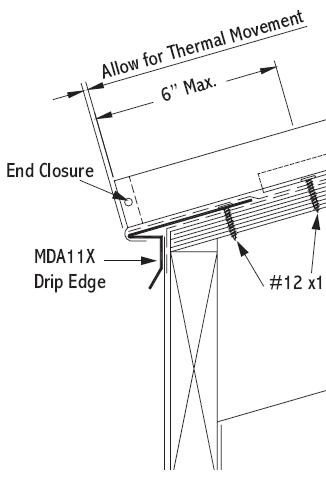
(The part labeled "MDA 1 1X Drip Edge" is the hooked eave. This is how it looks from the side.)
Vs.
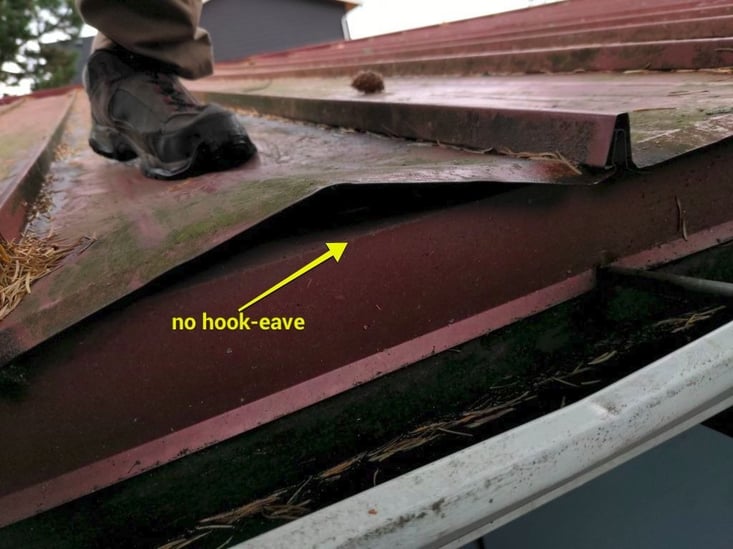
This prevents water from hitting the raw edge of the metal because it would be sitting at the edge of the gutter. It protects the roof from rusting, and it’s also a great way to secure the edge of the roof so that bugs or other pests don’t get underneath it.
There are other companies that do that one, so that's not as unique. But it's still not the standard.
Advanced installation techniques:
- Floating clip system for standing seam roofs to allow expansion/contraction
- Ability to custom fabricate parts (e.g., matching chimney caps)
Use Clip-Lock Panels for Best Flexibility
There are a few different options for what kind of standing seam panel you can get. We typically use a clip system with snap-lock panels. It’s a bit more expensive than the standard option (snap-lock nail strip panels), but it is less likely to tear or break.
With the nail strip panels, you just screw right through the panel and then snap over it. But the problem with that is that if you've got a longer panel, it's going to expand and contract.
And there's no room for it to expand and contract because the panel's been pinned underneath by the nails. As a result, you end up with a lot of buckling that can tear the fasteners.
Clips allow the panel to shift as it expands and contracts, giving it more flexibility and durability.
How much should you expect to pay for a metal roof in the Seattle area?
Now that you understand what sets a high-quality metal roof installation apart, you're probably wondering: how much is it actually going to cost?
While metal roofing offers exceptional longevity and protection (especially in Seattle’s rainy, wind-prone climate), the upfront price can vary a lot depending on the material, roof size, and installation method.
To help you make an informed decision, we’ve put together a detailed breakdown of what goes into the cost of a metal roof in the Seattle area.
Read our article “How Much Does it Cost to Install a Metal Roof in the Greater Seattle Area?” to learn average price ranges, cost comparisons with asphalt, and tips to avoid overpaying.
Topics: