

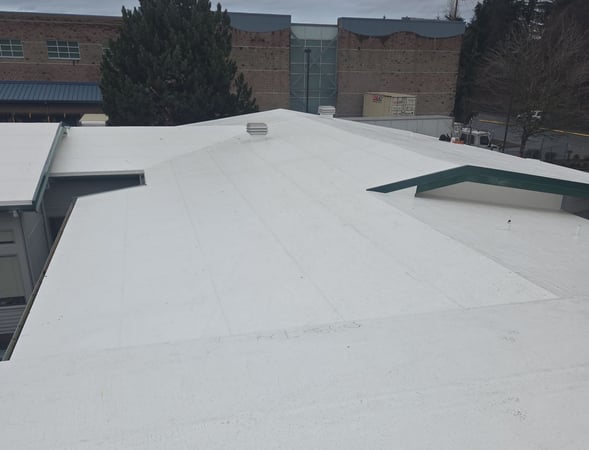
TL;DR: Summary
A badly installed torch down roof will absolutely cause leaks, hidden moisture damage, and extensive rot on a flat roof.
The most vulnerable areas are the roof edges and seams, where improper flashing or poor waterproofing allows water to seep behind the fascia and into the structure over time.
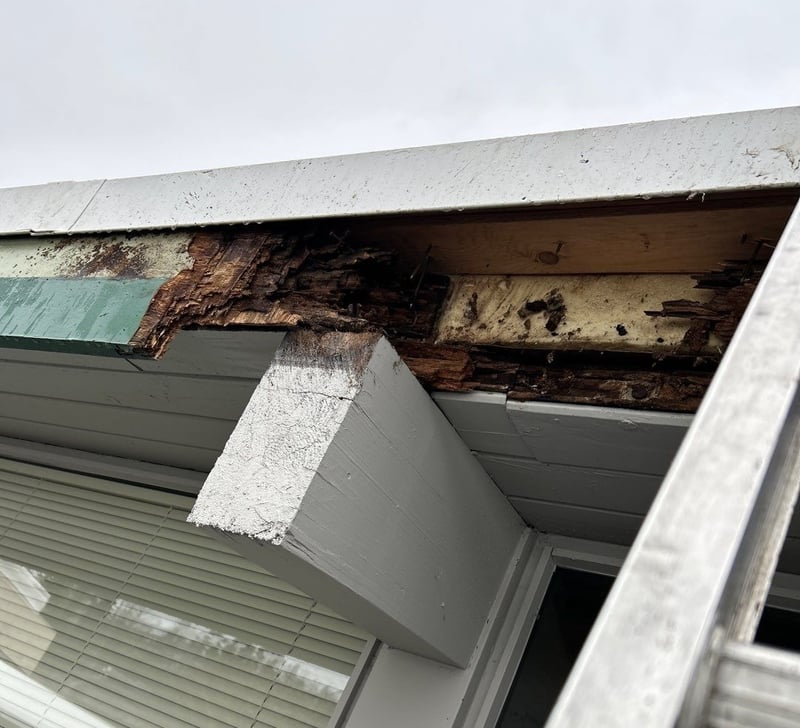
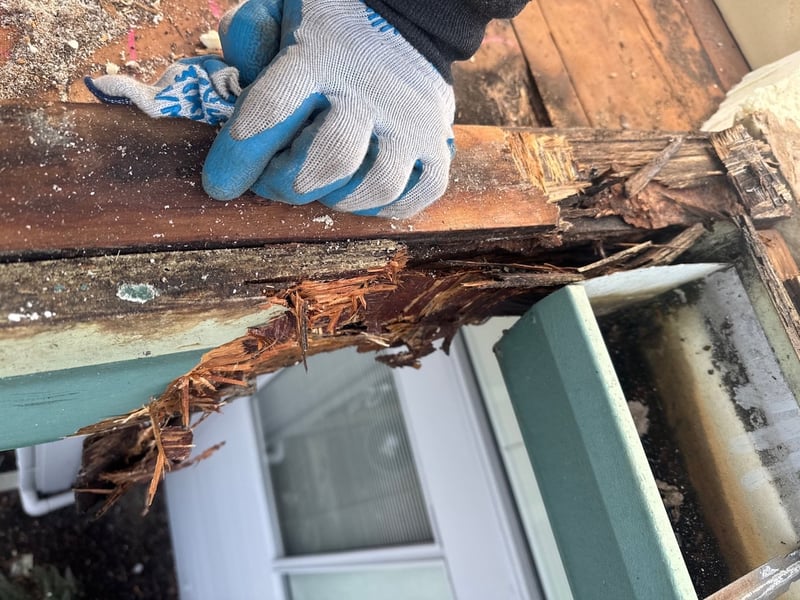
In this case study, major rot developed along the roof edges because the original installation lacked proper edge protection and waterproof detailing.
The key takeaway: proper flashing, fascia protection, and waterproof edge details are critical on low-slope roofs, and upgrading from torch down to PVC can improve leak resistance and long-term durability in Seattle’s wet climate.
Are you worried that a small leak on your flat roof could already be causing hidden rot inside your roof or walls? Have you noticed signs of water damage around the edges of your roof and wondered if your torch down roof was installed incorrectly from the start?
Because these roofs drain slowly and deal with constant rain, even small installation mistakes around seams, edges, or flashing can allow water to seep into the roof for years before anyone notices. By the time the damage becomes visible, the repairs can be extensive and expensive.
At RoofSmart, we’ve replaced over 100 flat and low-slope roofs in the Seattle area in the last couple years alone. We’ve also inspected hundreds of torch down roofs, giving us the expertise to know what causes a torch down roof to fail.
In this case study, we’ll break down the installation mistakes we found on a low-slope torch down roof in Renton, how these failures led to leaks and rot, and what we did differently to properly waterproof this customer’s roof in Seattle’s climate.
Common Problems Caused by Poor Torch Down Installation
|
Problem |
What It Looks Like |
What Causes It |
Risk Level |
Typical Solution |
|
Fascia Rot |
Soft or crumbling edge boards |
Water backing up behind edge |
❌ Very High |
Replace fascia + improve edge flashing |
|
Leaking Roof Edges |
Water stains near perimeter |
Poor eave or apron flashing |
❌ Very High |
Install proper flashing system |
|
Failed Seams |
Splitting or open membrane seams |
Poor sealing during install |
⚠️ High |
Reseal or replace roofing sections |
|
Hidden Water Damage |
Rot beneath roof surface |
Long-term unnoticed leaks |
❌ Very High |
Tear-off and structural repair |
|
Fire Risk During Install |
Burned or exposed insulation |
Torch applied directly to foam |
❌ Critical |
Replace unsafe assembly |
|
Ponding Water Damage |
Standing water on roof |
Poor drainage or weak material |
⚠️ High |
Upgrade to PVC or redesign drainage |
|
Gutter Overflow Backflow |
Water entering roof edge |
Inadequate flashing extension |
⚠️ High |
Install apron flashing properly |
Can a poorly installed torch down cause my low-slope roof to rot?
The short answer: Yes! Low-slope roofs must be installed and sealed properly so that water does not get the chance to drip into unsealed seams or seep over the edge and back into the roof. Any water that is able to leak into the roof will definitely cause rot.
The amount of rotting wood on your low-slope roof depends on these factors:
- How many leaks you have
- How long your roof has been leaking
One small leak that is caught after a few weeks might not cause much damage. However, if it goes on for years before anyone notices, you could be looking at extensive damage. Roof leaks can stay hidden for a long time before they show any evidence of existing.
We recently had a customer who faced this exact same problem. They had a siding contractor come out to do some work on their siding because it looked like there was something wrong with the fascia boards.
When the siding contractor noticed that there was a lot of rotting wood, he recommended that the customer call up someone who specializes in roofing and framing issues. So, the customer called us up, and we began work on their roof after an inspection.
The plywood underneath the roof itself wasn’t that bad, but there was a ton of rot in the fascia along the outer edges of the roof:
What precautions should my roofer take to prevent leaks on the edge of my low-slope roof in Seattle?
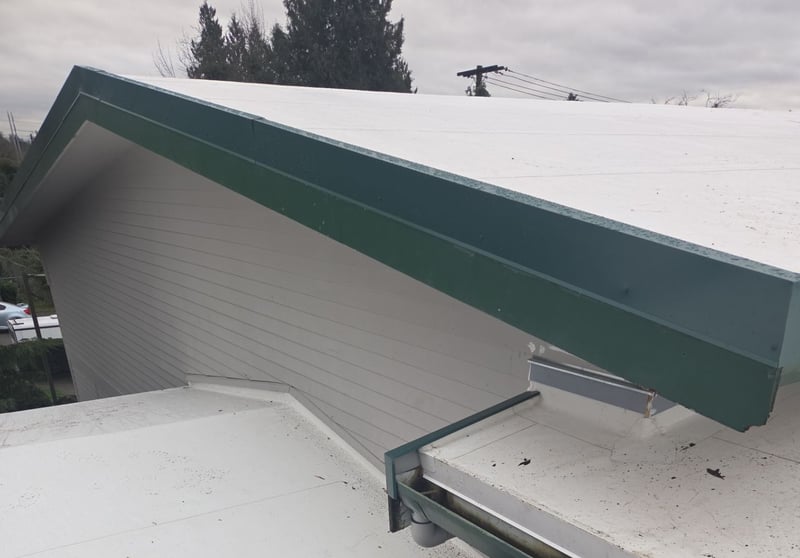
The edge details are crucial when trying to prevent leaks in the fascia. Two things that RoofSmart did on our customer’s building to prevent leaks along the outer edge of the roof were adding a metal fascia cap and eave flashing.
The metal fascia cap sticks up so that water doesn’t blow over the edge of the roof:
The other piece of this is the eave flashing, located in these spots:
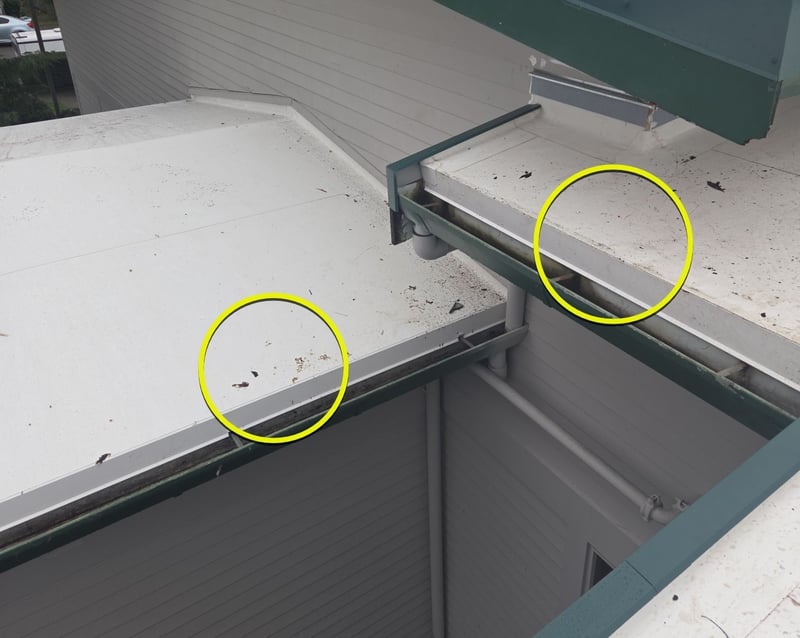
This flashing is installed in those spots and runs along the entire edge of the roof. It’s an apron flashing, so you can only actually see the part that sticks out from underneath the PVC. It folds over the corner and sits on top of the roof, going back underneath the PVC another 4 inches.
And that's done so that you don't get any water coming down and splashing back behind the gutter. This gives the roof protection in case the gutters get plugged and start to overflow. Water won’t be able to get back into the roof.
We took this extra precaution because we suspect that in the old roof, the flashing didn't come down or extend back that far, and if the gutter plugged, it would backflow up under the roof. We think that's how they got a lot of their rot.
We also encouraged the customer to switch from torch down to PVC because torch down is more susceptible to water damage and is harder to work with along the edges. On the other hand, PVC is good at handling standing water and is much more flexible (which makes it easier to install and seal properly).
How is PVC properly installed on a low-slope roof?
Aside from the extra precautions that we took to waterproof the edges of the roof, installing PVC is pretty much the same on a low-slope roof and a flat roof.
Because we were replacing this roof in the winter, we had to be cautious of the rain. To protect the roof from moisture and prevent the PVC roof from failing, we tore off and replaced the roof in sections instead of doing each step all at once.
Here are the steps that we took to properly install PVC on this roof:
1.) Tearing off the torch down: Before the PVC could be installed, we needed to remove the old torch down. Whoever installed the torch down placed it directly on top of the foam insulation boards in some sections of the roof. This is a huge fire risk, and it slowed down the removal process.
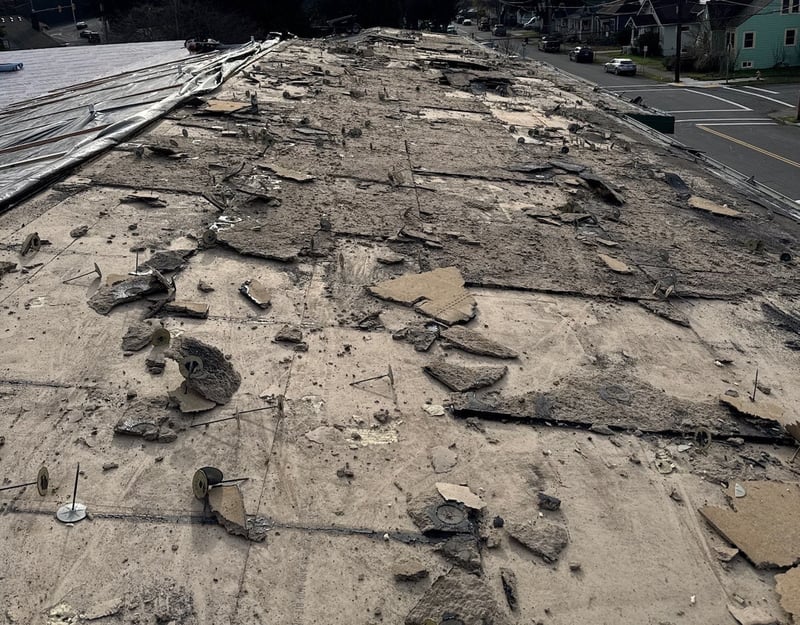
2.) Replacing rotting plywood and installing underlayment: There were a few spots where the framing or roof decking was rotting and needed to be replaced. Then, they installed a layer of underlayment to help protect the roof from moisture.
3.) Install foam insulation and DensDeck gypsum boards: DensDeck is a brand of gypsum board that we like to use on flat and low-slope roofs because it is even more water-resistant than plywood (our classic go-to on many other roofs). It’s great for preventing rot. First, the foam insulation goes on to help prevent condensation. Then, moisture-resistant gypsum boards go on top of the foam to create a stable base for the PVC to be installed on.
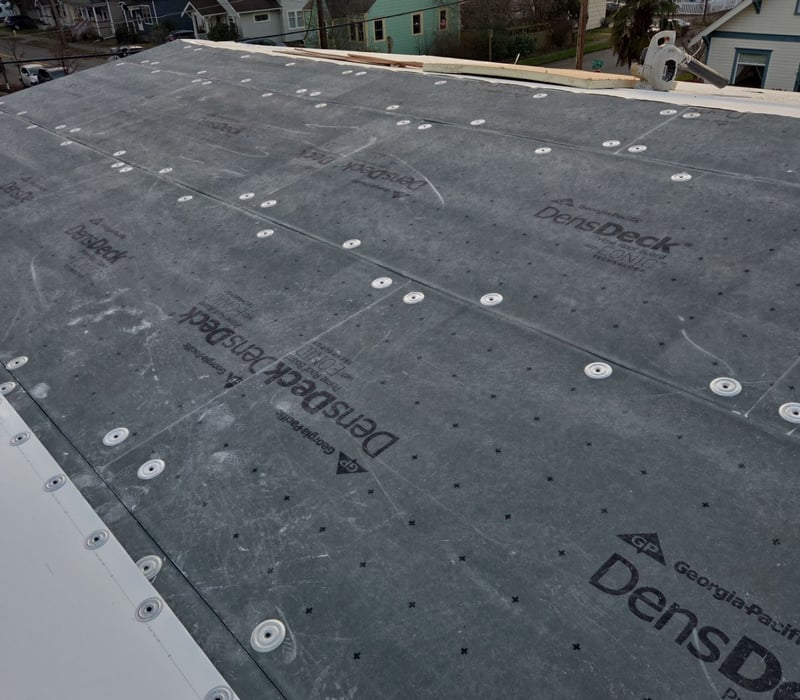
4.) Install flashing and PVC: The final layer that goes on the roof is PVC. While this is being installed, the crew made sure to install apron flashing at the eaves to protect it from water damage.
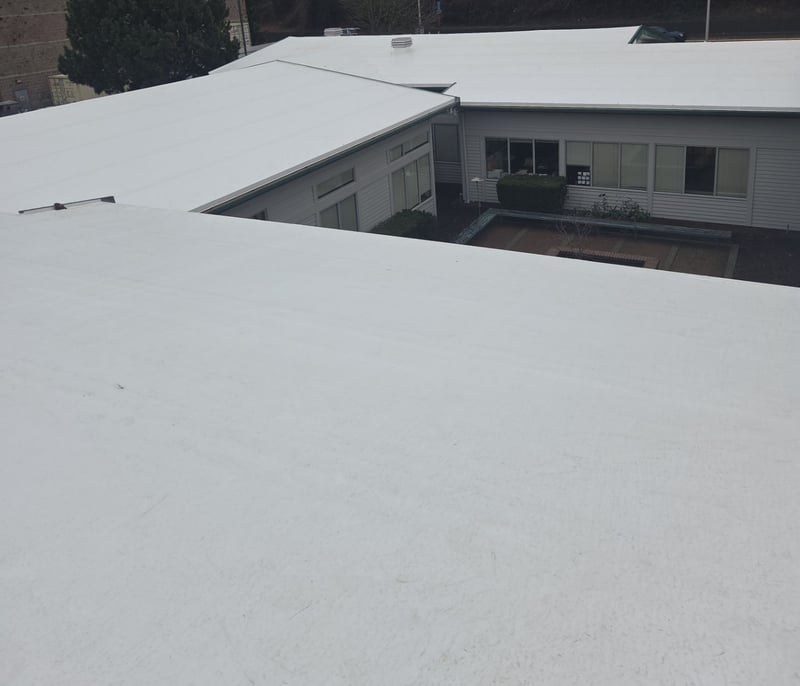
5.) Installing metal fascia cap: The final roof piece was the custom-made metal fascia cap that we made at RoofSmart specifically for this roof. It protects the fascia from leaks.
6.) Fascia replacement: The customer requested that we do more fascia work since there was so much rot, and the siding company they originally hired didn’t want to deal with it.
Is PVC a better long-term roofing option than torch down for Seattle’s low-slope roofs?
As you’ve seen, low-slope roofs are extremely vulnerable to leaks when torch down is installed poorly, especially around the edges, seams, and flashing details. In this case, years of hidden water intrusion led to extensive fascia rot and a much larger repair project than the homeowner expected.
That’s exactly why the roofing material itself matters so much. While torch down has been used for decades, it’s less forgiving when it comes to installation mistakes and standing water.
PVC, on the other hand, offers greater flexibility, stronger waterproofing performance, and better protection against the constant moisture Seattle roofs deal with year-round.
Read our article “Torch Down vs Single-Ply PVC: Which One Is Best for Your Roof?” to get a breakdown of the key differences between torch down and PVC roofing systems so you can understand which material is the better fit for your low-slope roof, budget, and long-term goals.
Frequently Asked Questions About Low-Slope Roof Installations and Problems
1. Can a poorly installed torch down roof cause rot?
Yes, especially on low-slope roofs.
If seams or edges are not sealed properly, water can:
- Leak into the roof assembly
- Saturate plywood and framing
- Cause hidden rot over time
The longer the leak goes unnoticed, the worse the damage becomes.
2. Why are roof edges so vulnerable on low-slope roofs?
Roof edges are exposed to:
- Overflowing gutters
- Wind-driven rain
- Standing water
Without proper flashing and fascia protection, water can work its way back into the roof structure.
3. Is PVC better than torch down for low-slope roofs?
In many cases, yes.
PVC roofing:
- Handles standing water better
- Is easier to seal properly
- Provides more flexibility around edges and details
This makes it a strong option for wet climates like Seattle.
4. What is apron flashing and why is it important?
Apron flashing is a protective metal flashing installed along roof edges.
It helps:
- Direct water away from the roof
- Prevent water from backing up behind gutters
- Protect fascia and roof decking from leaks
Proper installation is critical on low-slope roofs.
5. What materials are installed underneath a PVC roof?
A properly installed PVC roof system may include:
- Underlayment
- Foam insulation
- DensDeck gypsum board
- Flashing components
These layers work together to improve moisture resistance and prevent rot.
Topics:
