

TL;DR: Summary
Long-term drainage problems on a rooftop deck can lead to severe structural damage, including rotting wood, failing support posts, deteriorating roofing membranes, and water trapped beneath the waterproofing system.
In this case study, years of ponding water caused widespread damage because the original drainage system lacked proper tapering and allowed water to collect beneath the membrane. The repair required rebuilding the drainage system with a custom taper design, adding a new through-wall scupper, installing insulation, replacing structural components, and installing a new PVC roofing system with pedestals underneath the tiles.
Proper drainage is one of the most important factors in the longevity of a rooftop deck, especially in Seattle's wet climate, where standing water can quickly accelerate deterioration.
The key takeaway: drainage problems rarely stay isolated. Investing in proper tapering, drainage design, and high-quality roofing materials can prevent extensive structural repairs and significantly extend the life of your rooftop deck.
Has your rooftop deck been leaking for years, leaving you wondering how much hidden damage might be lurking beneath the surface? Are you worried that repeated patch repairs aren't actually solving the problem and that standing water could be quietly rotting your roof structure and leading to an even more expensive repair down the road?
Long-term drainage problems on a rooftop deck rarely stay small. What starts as ponding water or a slow leak can eventually lead to rotten structural posts, failed waterproofing membranes, hidden moisture beneath the roof system, and major reconstruction.
At RoofSmart, we have repaired and replaced over one hundred rooftop decks and flat roofs in the Seattle area. Once a leak starts, it wreaks havoc on the roof decking and can completely rot your roof decking after enough time.
A lot of roofers do not know how to set up rooftop decks properly with the right taper and drainage systems to prevent standing water and leaks. It’s an incredibly common issue in the Seattle area.
In this case study, we'll show you how years of poor drainage severely damaged one Seattle rooftop deck, the hidden problems we uncovered after removing the old membrane, and the custom drainage, insulation, and waterproofing system we installed to give the rooftop deck a fresh start and prevent the same failures from happening again.
Long-Term Rooftop Deck Drainage Problems and Repairs
| Problem | What Causes It | Damage It Can Create | Typical Repair |
|
Ponding water |
Inadequate slope, undersized drains, clogged scuppers, or poor taper design |
Membrane deterioration, added weight, and recurring leaks |
Install a tapered insulation system that directs water toward drains |
|
Water beneath the membrane |
Failed seams, poor adhesion, punctures, or improper installation |
Membrane separation, trapped moisture, and hidden deterioration |
Remove the damaged membrane, dry the deck, and install a new waterproofing system |
|
Rotten support posts |
Water repeatedly reaches wood posts or penetrates their outer coverings |
Loss of structural strength and possible collapse |
Remove and replace the damaged posts after correcting the leak source |
|
Internal scupper leaks |
Drainage passes through concealed wall cavities |
Hidden wall damage, rot, and difficult-to-locate leaks |
Add or replace drains with properly flashed through-wall scuppers |
|
Clogged drains |
Leaves, dirt, and debris restrict water flow |
Standing water and overflow into vulnerable areas |
Clean the drainage system and improve access for future maintenance |
|
Lack of tapering |
The deck was built too flat or has settled over time |
Water remains in low spots instead of reaching drains |
Create positive drainage with custom tapered insulation |
|
Condensation below the membrane |
Insufficient insulation allows warm interior moisture to contact cold surfaces |
Trapped moisture, mold, and damage below the roof assembly |
Install properly designed layers of rigid insulation |
|
Membrane installed over foam |
The membrane lacks a solid attachment surface |
Movement, punctures, weak adhesion, and premature failure |
Install a durable cover board such as DensDeck over the insulation |
|
Low door clearance |
Added insulation and cover boards raise the finished deck height |
Water can enter at the threshold or prevent proper installation |
Raise and reframe the door opening before finishing the roof |
|
Pavers installed directly on membrane |
Tiles trap moisture and place concentrated pressure on the waterproofing |
Slow drying, abrasion, punctures, and concealed water buildup |
Install pavers on adjustable pedestals that allow drainage and airflow |
What kind of damage can drainage issues on a rooftop deck cause?
Letting your rooftop deck or flat roof drain poorly for years can cause a lot of damage to your rooftop deck. The most common issue that comes from years of leaking is rotting wood. However, if your rooftop deck is made of concrete, then you won’t have as much rot to worry about.
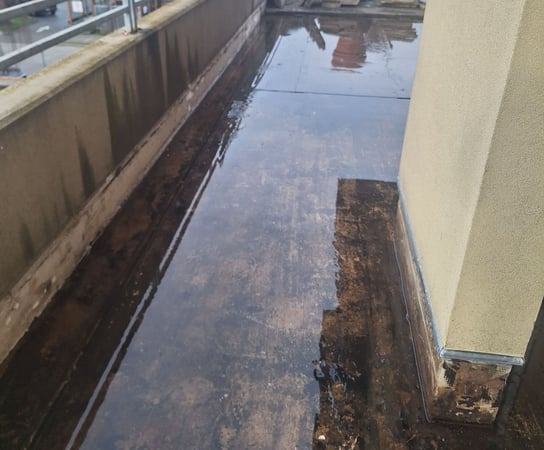
For example, we just recently worked on a rooftop deck that had a poorly set up drainage system, meaning that there was water sitting all over the roof, even underneath the membrane.
This is what it looked like when the membrane was removed:
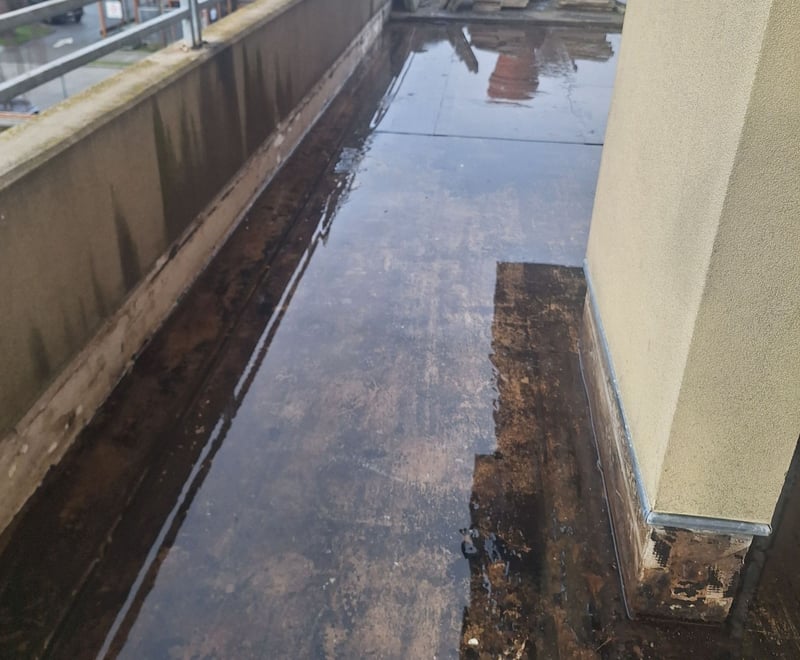
This excessive amount of water caused two main issues on this roof:
1. Water pulling up the membrane: In some places, the membrane was glued down really well and was more difficult to remove. However, in some places the membrane wasn’t installed properly, so the water got underneath it, evaporated over time, and then pulled the membrane away from the concrete deck. This means that the membrane wasn’t really attached in various places across the roof.
2. Extreme rot in the posts: Any areas with wood on this rooftop deck were completely destroyed. For example, we had to replace two major support posts. In the picture above, you can’t really see the problem, but here’s what it looked like when we removed the outer layer:
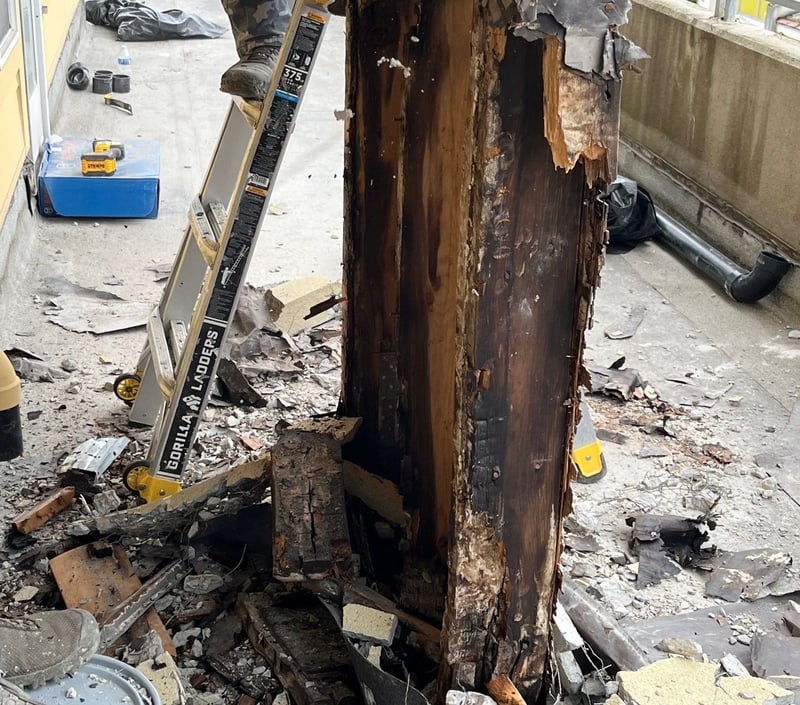
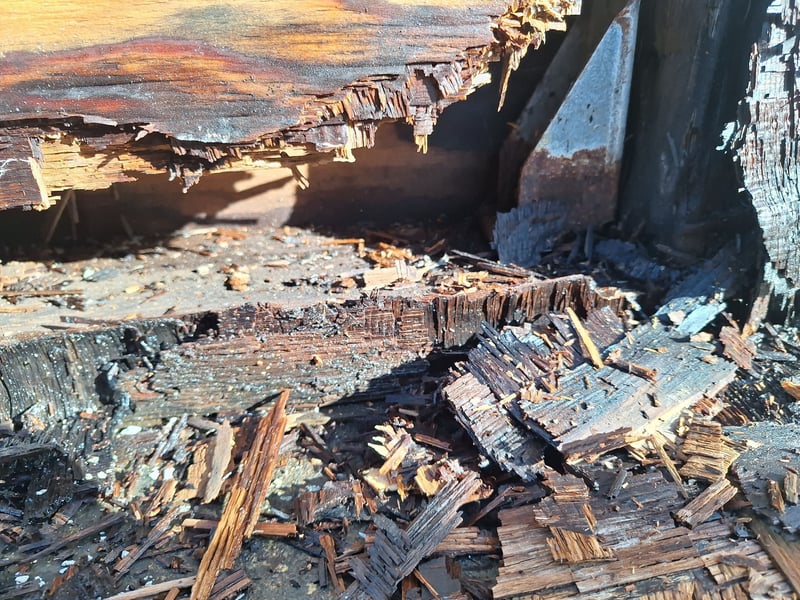
The entire thing was super rotten. Honestly, we’re still not sure how it remained standing for that long. This is the type of damage that we always see when a rooftop deck that leaks internally for years and years. Any wood used on the rooftop deck will get completely ruined.
As you can see, the base of it was completely crumbling away. Unsurprisingly, we had to replace the entire post:
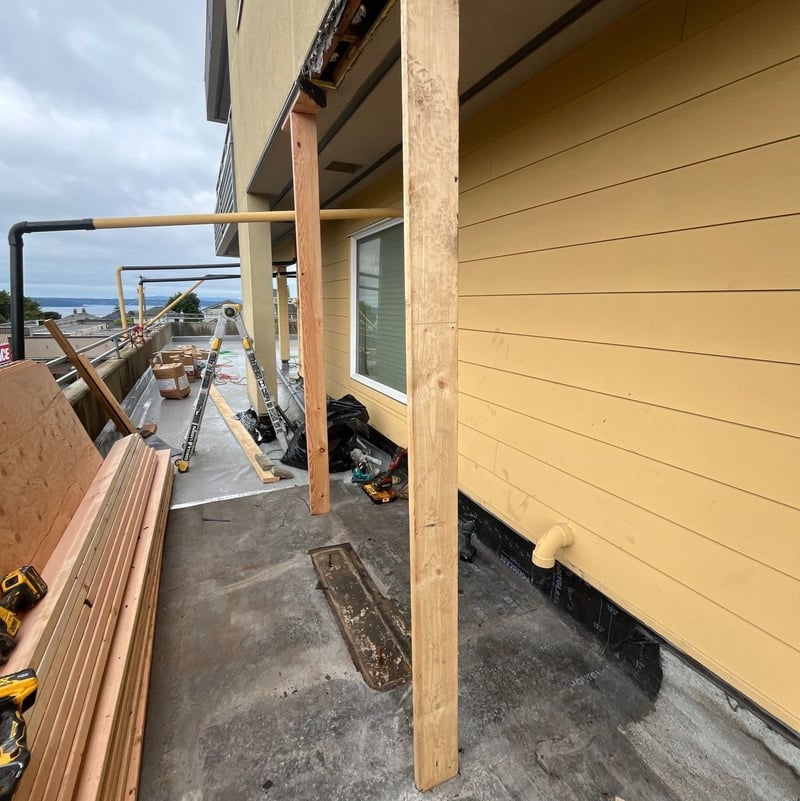
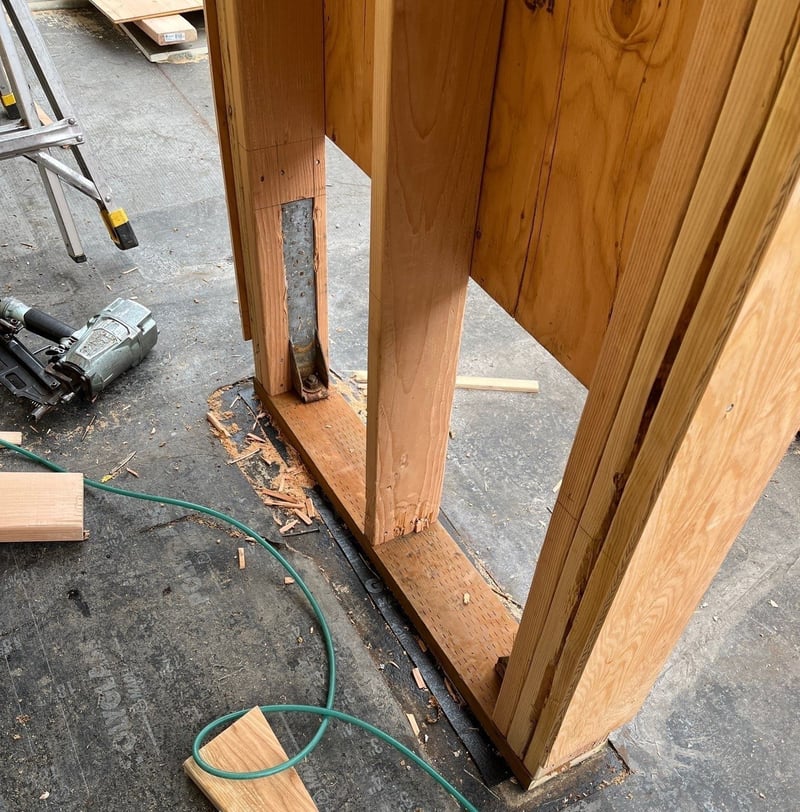
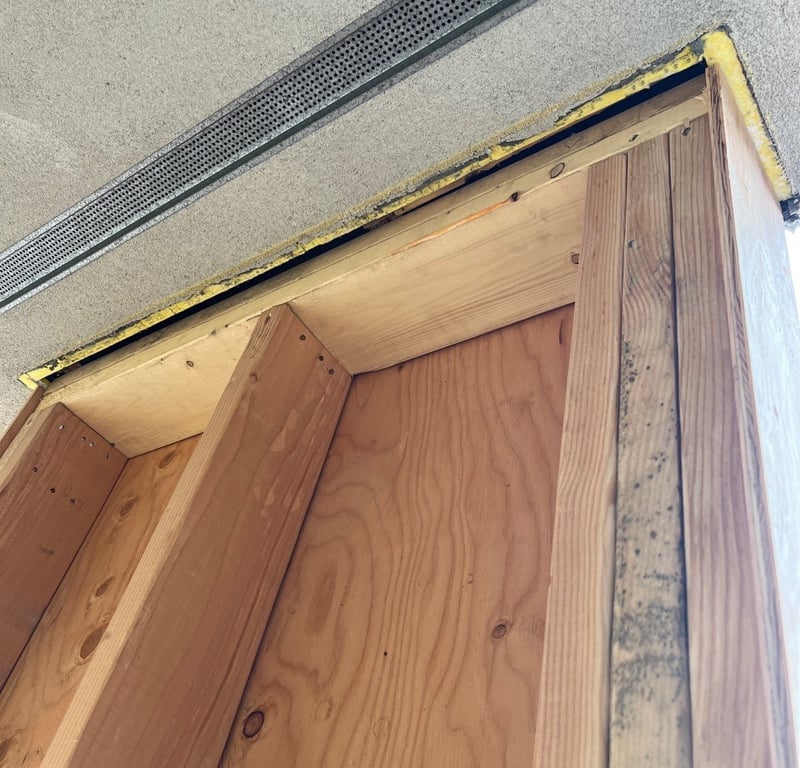
The major problem with this roof is that there was an excessive amount of water everywhere, even if it hadn’t rained in a while. There was a drain that ran all the way around the roof, and it was usually filled with water. We suspect it was about 4 inches deep.
It was sitting underneath the membrane. You can see part of it has been uncovered in this image:
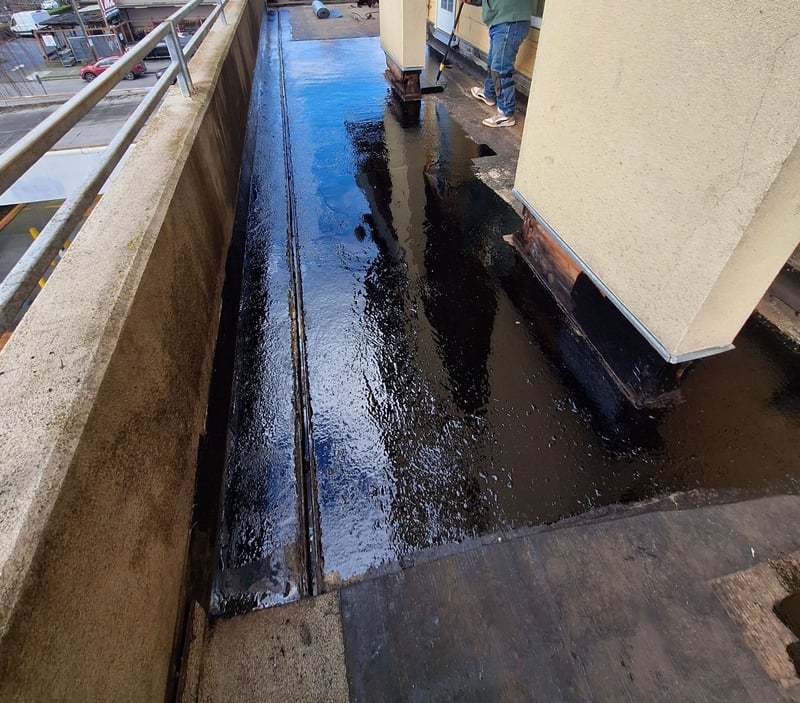
Even if it hadn’t rained in a while, the drain was pretty full, which was the main problem with the drainage system on this roof. Too much water was collecting and sitting around instead of draining due to a poor setup and lack of tapering.
How did RoofSmart fix the drainage problems on this rooftop deck?
In order to make sure that this rooftop deck no longer had drainage problems, we collaborated with our local representative from Duro-Last to create a new taper system for this roof. We also installed a new scupper to help ease the burden on the other drains.
The other scuppers on this rooftop deck were built inside the wall and had some clogging issues. We decided that the new drain should be a through-wall scupper. Here’s what it looks like:
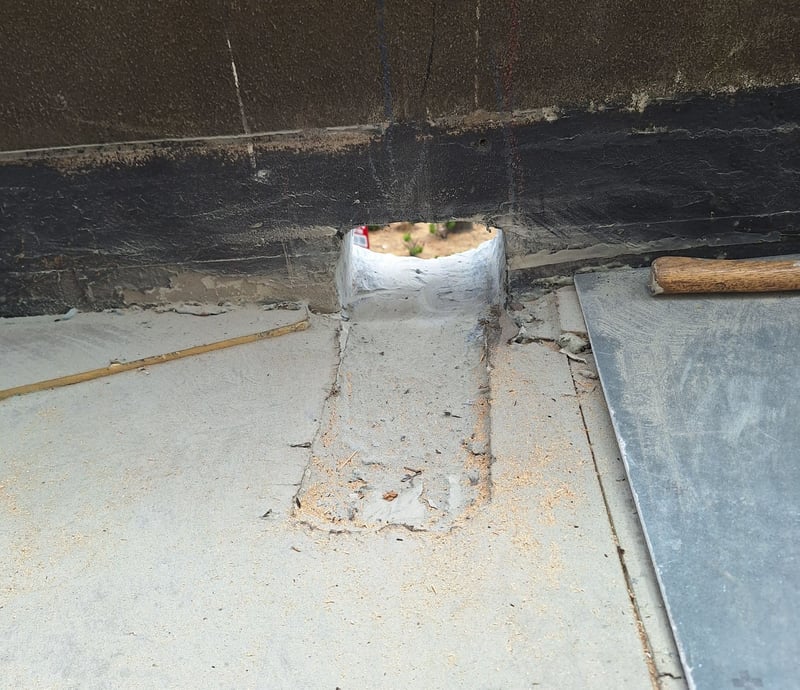
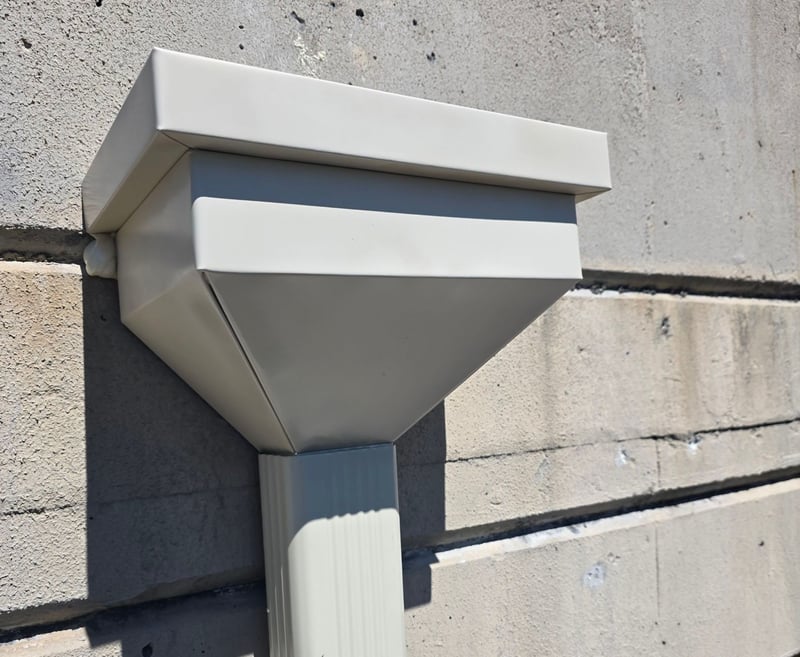
Instead of just going straight down like the other scuppers, this one flows water through the wall into a downspout that is attached to the outside of the building right at this opening. Through-wall scuppers are a safer design because they reduce the possibility of leaking inside the walls of the building.
Once we removed the excess water and dried the rooftop deck off, we could begin the process of installing the new roofing materials. We had to do this replacement in different sections across the roof to prevent any exposed roofing from getting wet.
The steps we took to repair and protect this rooftop deck include:
- Installing 2 layers of polyiso foam boards: Our first step was to glue down two layers of foam insulation. This is essential on any rooftop deck or flat roof in the Seattle area because it protects you from having condensation issues underneath the membrane. This is what the first layer looks like:
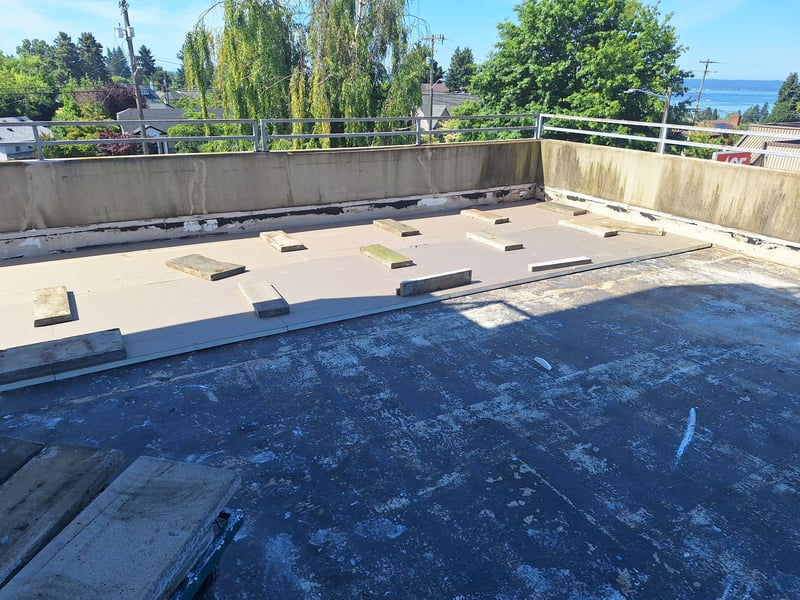
It’s being held down by concrete tiles to make sure that it gets fully secured in place with the glue.
- Installing DensDeck gypsum board: After the two layers of foam insulation, our crew put in DensDeck. This step is necessary so that the PVC membrane has something solid to attach to. You cannot install on the foam insulation. DensDeck is a roof decking board that is incredibly water-resistant. We recommend using it on rooftop decks in place of plywood because if there is a leak, then you won’t have to deal with rotting wood. They had to have DensDeck come out a couple of different times to inspect and approve the different phases of installation. This is part of their regulation process for certain types of buildings.
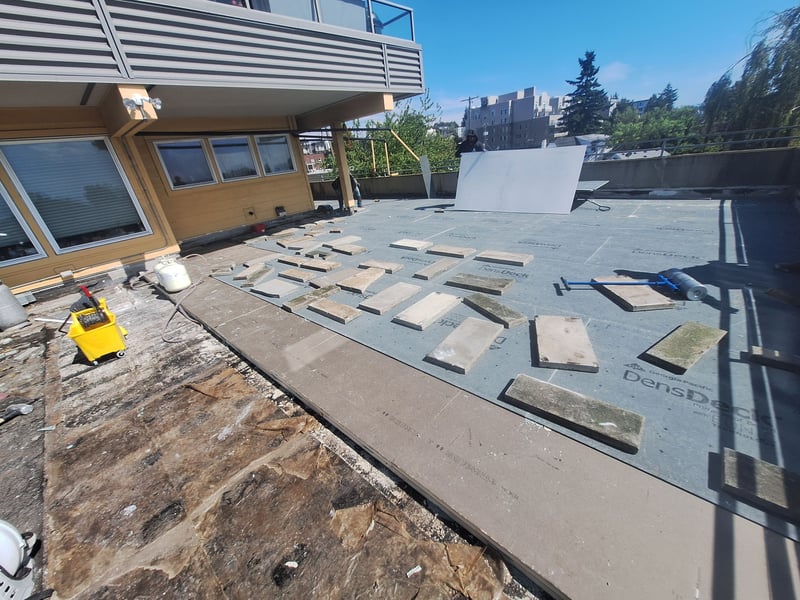
- Moving up the doorframe: The foam insulation is a few inches thick, so adding two layers of it plus the DensDeck boards meant that the rooftop deck had grown in height. As a result, it was necessary to move the doorframe up. This is a common issue on rooftop decks.
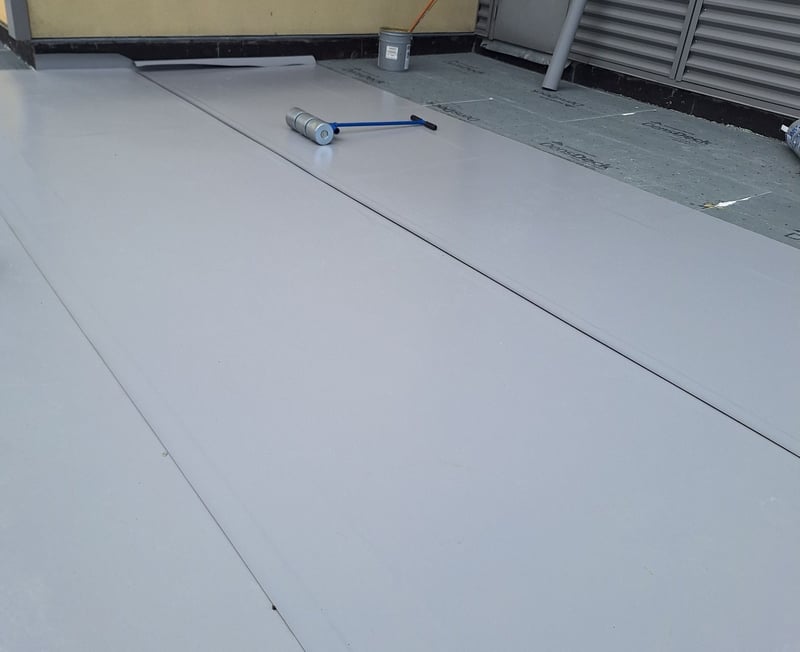
- Installing the DuroLast PVC membrane: The next step was to install the PVC membrane made by DuroLast. Here’s what the rooftop deck looked like as the PVC was being installed:
- Reinstalling the concrete tiles on pedestals: The final layer of roofing that needed to be installed was the concrete tiles, except this time they would be installed on a pedestal system rather than directly on the membrane. Using a pedestal system gives room for water to drain if it somehow gets underneath the tiles. Plus, it gives the tiles some breathing room to dry out in case there is moisture.
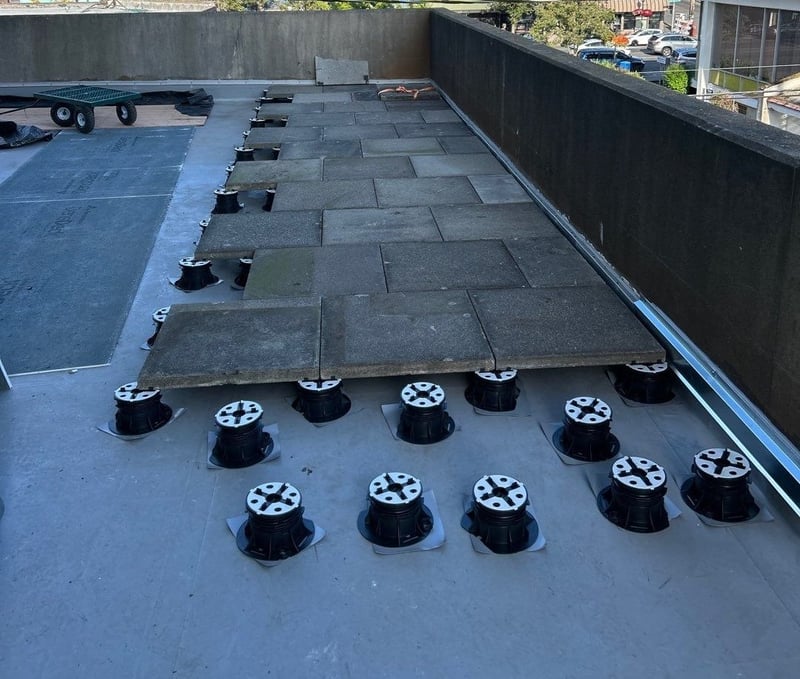
This type of replacement was very labor-intensive and time-consuming. But, in the end, the customer was very happy with the careful attention to detail that this crew displayed. Although this job was expensive, I think the customer feels that it was worth it, especially after hiring others for less thorough repairs that eventually failed.
How Much Does It Cost to Repair a Rooftop Deck in Seattle?
As this project demonstrates, drainage problems on a rooftop deck can compromise the entire structure underneath. Years of standing water led to rotten support posts, a failed membrane, hidden moisture beneath the roof system, and a complete redesign of the deck's drainage.
While these problems were extensive, they also highlight why it's so important to address drainage issues before they turn into a full structural rebuild.
Every rooftop deck repair is different. A small membrane repair costs far less than replacing structural framing, installing tapered insulation, raising door thresholds, and rebuilding the waterproofing system.
Read our article “How Much Does It Cost to Repair a Rooftop Deck in Seattle?” to learn what Seattle homeowners typically pay for rooftop deck repairs, which issues have the biggest impact on project costs, and why addressing drainage and waterproofing problems early can save tens of thousands of dollars over the life of your roof.
Frequently Asked Questions About Drainage Issues on Rooftop Decks
1. What happens when water sits on a rooftop deck for years?
Water that remains on a rooftop deck for long periods can gradually damage the membrane, insulation, drainage system, and any nearby wood components. It may also work its way underneath the membrane, where it can remain hidden and continue causing damage between rainstorms.
Over time, chronic ponding water can lead to membrane separation, leaks, rot, mold, and structural deterioration. The longer the problem continues, the more extensive and expensive the repair is likely to become.
2. How can water get underneath a rooftop deck membrane?
Water can enter beneath the membrane through failed seams, punctures, improperly flashed penetrations, damaged drains, or areas where the membrane was not securely attached. Once underneath, the water may spread across a large portion of the deck instead of remaining near the original leak.
Trapped moisture can also evaporate and create pressure beneath the membrane, causing it to bubble, lift, or pull away from the surface below.
3. Can rooftop deck drainage problems cause structural damage?
Yes. Water can severely damage support posts, framing, wall components, and other structural wood. A post may appear intact from the outside while the wood inside is soft, hollow, or crumbling.
When rot affects a load-bearing component, the area may become unsafe. Damaged structural members must be replaced, and the drainage or waterproofing problem that caused the rot must be corrected at the same time.
4. Why does a rooftop deck need a taper system?
A taper system creates a controlled slope that directs water toward drains or scuppers. Without adequate slope, water collects in low areas and remains on the deck instead of flowing away.
Each taper system should be designed for the specific rooftop deck. The layout must account for drain locations, walls, door thresholds, support posts, rooftop equipment, and existing high and low points.
5. What is a through-wall scupper?
A through-wall scupper is an opening that carries water through a parapet or exterior wall and releases it into an exterior downspout or drainage area. It provides a direct route for water to leave the rooftop deck.
Compared with drainage components concealed inside walls, a properly installed through-wall scupper can make leaks easier to detect and reduce the amount of plumbing hidden within the building envelope.
6. Why are layers of polyiso insulation installed on a rooftop deck?
Polyiso insulation helps reduce heat transfer and protects the roof assembly from condensation. This is especially important in Seattle, where warm indoor air can meet cold roof surfaces and create moisture beneath the membrane.
Multiple layers can also be arranged as part of the taper system. This allows the insulation to provide both thermal protection and the slope needed to move water toward the drainage points.
7. Why is a cover board installed over foam insulation?
Rigid foam insulation is not usually strong enough to serve as the direct attachment surface for a rooftop deck membrane. It can compress, shift, or become damaged under foot traffic and concentrated loads.
A cover board such as DensDeck creates a firmer and more durable surface for the membrane. It also helps protect the insulation and improves resistance to punctures, impacts, and moisture-related damage.
8. Why might a rooftop deck door need to be raised during repairs?
Adding tapered insulation, multiple insulation layers, a cover board, and a new membrane increases the finished height of the rooftop deck. If the existing door threshold is too low, the new roofing assembly may leave insufficient clearance.
Raising and reframing the door opening helps preserve proper waterproofing height. It also reduces the risk of water flowing toward or entering through the doorway.
9. Why should rooftop deck pavers be installed on pedestals?
Pedestals lift the pavers above the waterproofing membrane. The open space underneath allows rainwater to flow toward the drains and gives moisture room to evaporate.
A pedestal system also prevents the pavers from sitting directly on the membrane, where they could trap water, cause abrasion, or place concentrated pressure on the waterproofing material.
10. How can I tell whether my rooftop deck has a serious drainage problem?
Warning signs include:
- Water remaining on the deck long after rainfall
- Drains or scuppers that stay full
- Soft or unstable areas beneath the walking surface
- Loose, bubbling, or lifted membrane
- Water stains on ceilings or walls below
- Rot around posts, railings, doors, or parapet walls
- Musty odors or visible mold
- Repeated leaks that return after minor repairs
A professional inspection may require removing pavers or opening portions of the roof assembly. This is often the only way to determine how far the water has traveled and whether structural materials have been damaged.
Topics:
